Monday, January 29, 2018

It's All Perspective

A bunch of various hardware items may be seen by some as serving a practical use, by some as tools of their trade, by some as completely insignificant..


...but by some of us - creative potential...


As I was pondering the creative potential of hardware, I couldn't help but..
"Consider God's perspective..who looked at the dust and saw a human being."


I used the hinge to create a door. Inside the door...


"Gold is always found underneath the surface"
I was also challenged during the creation of this piece to broaden my perspective of people.


I have used Plasterboard Jointing Tape, Masking Tape and coarse sandpaper in the background.
The substrate is a piece of 12" x 12" box board cut in half and joined together.
The colour was achieved using Stampin'Up! inks.


I have used bolt cutters to cut the ends off the screws and glued them in place. I used the ends in the metal collage.


 I have added some gold embossing powder to the quote and antique gold charms.

I am looking forward to recreating this project on a smaller scale for a card.

Wednesday, January 24, 2018

You're Awesome - Ink and Brushos

Our youngest son has just recently reached his first savings goal by working hard over the school holidays in his new job. So I decided to make him a card recognising his efforts and to let him know how proud we are of him.


The stamp set is called "Epic Celebrations". The ink colours are Cajun Craze and Old Olive. I have also used Brushos Moss Green. The paper is ordinary copier paper.


I prepared my background papers first with ink and texture. I will be doing a tutorial on this technique later.


I used Brushos on the sentiment and headphones. I will be showing this technique in a later tutorial. I also sprinkled it over the background.


I dyed some gauze to add some further embellishment.


I prepared a liner on my computer and inked the edges.

I discovered a couple of new techniques creating this card. I am hoping to share them with you soon by way of tutorials. Stay tuned for that.
Saturday, January 20, 2018

Angel Wings - Shimmery White Embossing Paste

Another cool medium I received at Christmas was the new Stampin'Up!® Shimmery White Embossing Paste. As soon as I saw it I thought about angel wings.


The ink colours I have used are Pink Pirouette and Smoky Slate. I have die cut the cross using the "Cross of Hope" Framelits Dies. The flowers were created using the Blossom Builder Punch. I cut the angel wings from a sketch I drew.


After adding some ink to the wings, I added some water to the Shimmery White Embossing Paste and washed it across the wings. This added a lovely glittery finish without the dimension. After drying I brushed the Paste onto the wing tips to add some texture.


I also added the Paste to the background through a mask and dabbed it onto the cross. The flower centres have been rolled in the Paste.


I dabbed some Paste around the edges of the bottom layer of the quote.


I continued the Bible verse on the inside of the card.

I love how soft and delicate this card worked out and the pretty touch of the Shimmery White Embossing Paste.

Thursday, January 18, 2018

Best Friend - Silver Embossing Paste

I created a second card using Stampin'Up!® Silver Embossing because I wanted a better result using a mask.


This time I loaded a sponge with the Paste and dabbed it through my mask. I am much happier with the result. What it lacks in dimension, it makes up for in texture.
The stamp set is called "Happy Wishes". The inks colours are Elegant Eggplant and Night of Navy.
I also used the "Garden Trellis" embossing folder.


The top layer is torn copier paper. Underneath I have inked and embossed card. I applied some of the Silver Embossing Paste with my finger to the raised surface of the embossed card to highlight.


I have highlighted the edges of the paper with the Paste.


I created the flowers using the "Blossom Builder" punch. I have also edged the flowers with the Paste.


I really love the unique texture of the Silver Embossing Paste, making it so versatile. I'm sure I will be using it a lot more in the future.

Wednesday, January 17, 2018

Simply Amazing - Silver Embossing Paste

I was lucky enough to receive a box of Stampin'Up! products for Christmas from my husband. One of the products I received was Silver Embossing Paste. I have been experimenting with it for the past couple of days and I love it.


The stamp set I used is called "Amazing You". I also used the matching "Celebrating You" Thinlits Dies.
The ink colours are Island Indigo, Marina Mist and Basic Black Archival.


The Silver Embossing Paste is a much different consistency to our ordinary Embossing Paste. It is a bit like thick paint so when I tried to use it through a mask with a spatula it spread under the mask and was unsuccessful. I have since found a better way to use it with masks but I will save that for my next post.


Because of it's unique consistency I did find some really cool ways to use it. I was able to water it down to create a glaze over my inked paper which you can see behind the tear. I also splattered the watered down mix over my background.
I used a paint brush to dab it full strength over my word die cut. It created some great texture.
While I had my paint brush I brushed some over the paper edges.


The flower was created from my glazed paper. It is hard to see in the photo but I created some dimension in the top flower layer.
The Silver Embossing Paste also worked in my silicone cake decorating mould to create some butterflies.

I loved playing around with this Embossing Paste and I have discovered some other ways to use it which I will share in my next post.

Sunday, January 14, 2018

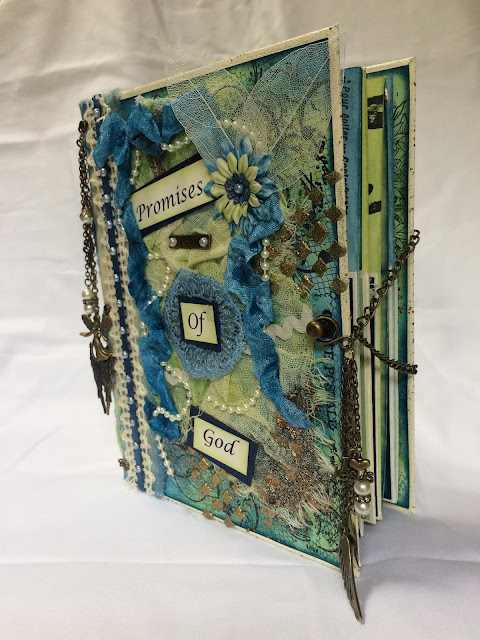
Mini Album of God's Promises

Before I joined Stampin'Up! as a demonstrator I only had a few of their older ink pads. One day I decided to break them out and have a play and this little mini album was the result.


The old ink colours I used were Certainly Celery and Not Quite Navy. 
For a similar effect with the new ink colours I would use Night of Navy and Pear Pizzazz or Pacific Point and Lemon Lime Twist.


I used several different embossing powders throughout the album.


A sample of some of the pages.
I just used my computer for some of my favourite Scripture quotes.


I really liked this page. I used an embossing folder to achieve the brick effect.
The stamps are just random stamps I had in my stash.

This little album was just a proto type. I would love to recreate it one day with a few little tweaks. 

Saturday, January 13, 2018

Mini Canvas

Sometimes our circumstances are just a natural part of life. Sometimes our circumstances are consequences. But sometimes you just have to suit up...

"Put on the whole armour of God, that you may be able to stand against the wiles of the devil."
Ephesians 6:11

Now I'm not one who likes to give too much attention or credit to the enemy but sometimes it helps to take on a broader perspective of the circumstances we find ourselves in.

No matter what circumstances you find yourself in today, know that you can choose to stand in the full armour of God, the victory of our Lord Jesus Christ.


I created this mini canvas to see how the Stampin'!Up inks would respond to the canvas surface.
I used Tempting Turquoise, Bermuda Bay, Pacific Point and Basic Black Archival inks.


I used embossing paste and a mask to achieve the brick texture. Once dried I added some gesso and more ink.
I also used one of our new masks from the "Sweet Soiree" collection in the background.
I collaged inked paper stamped with the "Post Script" background stamp. I have also used the Scripture stamp from the "Hold on to Hope" stamp set stamped randomly onto the background.


I have used a stamp  from the "Awesomely Artistic" stamp set to white emboss some dots in the background.


The flowers were created using inked copier paper and the "Blossom Builder" punch.


I used my computer and printer for the Scripture quote. I dyed some gauze with ink and added it behind the quote.


I die cut the cross from the "Cross of Hope" Framelits Dies, inked and silver embossed the edges. I used the negative space from the die cut to ink the background cross to add some depth.

I loved the way the inks played on the canvas surface and I'm looking forward to creating a larger one.

Tuesday, January 9, 2018

Sketchy Watercolour Tulips

I created a card today for my second daughter just because she is awesome.


I used our lovely watercolour stamp set called "Tranquil Tulips". The inks colours are Melon Mambo, Old Olive and Pacific Point.
I played around using various ink strengths on the stamp and misting it with water. Some appear to be in the background while the main image stands out, just like my beautiful daughter!


 Once my stamping had dried I used my uni-ball Eye pens to add sketchy lines to some of the stamped images making the lines thicker on my main image so it would pop out from the rest.


The sentiment is from the "Lovely Wishes" stamp set. I also added some sketchy lines to border the sentiment and to frame the entire picture.

It is amazing how different a stamp can look just by adding a few sketchy lines.

Art Impressions - As the Deer

 I am still learning how to paint water and still have a long way to go. I really need to work on shadows and reflections! The stamp sets ar...